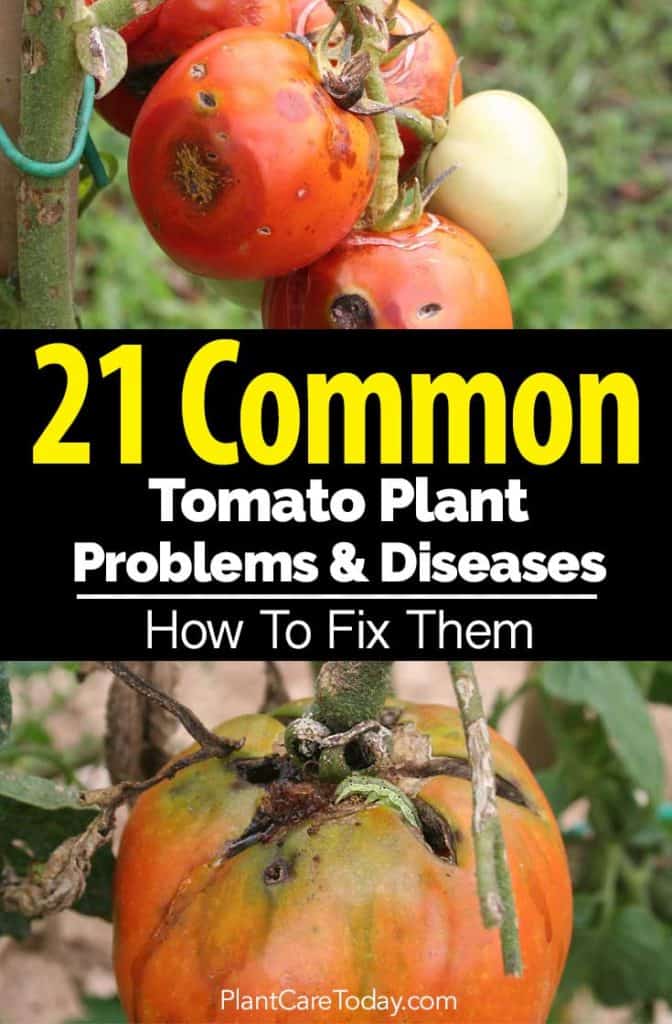
Why do we get the most questions asking about tomato plant problems?
I guess it is because every year millions of gardeners set out to grow their own healthy food. Of all the veggies grown, questions on growing tomato plants seem to be the most popular.
It’s easy to understand why this is true. Homegrown tomatoes are always 100% tastier than those bought at the grocery store.
It should come as no surprise that most gardeners include tomatoes in their garden, growing them in containers, hanging baskets, and other innovative, growing pursuits.
- Challenges And Tomato Growing Problems
- Learn To Recognize The Various Tomato Fruit Diseases, Pests & Other Problems Of Tomato Plants
- The Most Common Tomato Plant Problems
- 7 Common Growing Conditions Found To Reduce Tomato Plant Quality and Harvest
- 16 Common Tomato Plant Disease Or Ailments To Watch Out For
- 6 Solutions For Dealing With Tomato Plant Pests
- 5 Detrimental Pests That Will Decimate Your Tomato Plants
- Birds, Terrapins & Some Lizards Like To Eat Tomatoes
- Don’t Be Afraid! Tomatoes Are Easy To Grow!
Unfortunately, many obstacles stand in the way of successful tomato growth. In this article, we will discuss the top twenty-one challenges tomato growers will be most likely to encounter. Read on to learn more.
Challenges And Tomato Growing Problems
Frustration commonly goes along with the tomato growing process. It seems that these plants, though easy to grow, tend to come up with all manner of complications.
For example, some plants don’t set fruit. Some set fruit but are plagued by black, spongy spots on the bottom. In a more dramatic development, your plants may look perfect one day and collapse or be stripped of all leaves and fruit the next.

These are a few of the many problems plaguing hopeful tomato growers. Fortunately, dealing with these and many other frustrating tomato issues is relatively easy. Start by familiarizing yourself with common tomato threats.
Learn To Recognize The Various Tomato Fruit Diseases, Pests & Other Problems Of Tomato Plants
The first step in treating an ailing plant is to identify the problem correctly.
Follow these three steps to figure out exactly what is going on with your plant:
Identify The Affected Part Of The Plant
Is it the:
- Roots
- Stems
- Leaves
- Blossoms
- Fruit
- All of the above
Compare and Contrast
When you compare your ailing plant with a healthy one, what do you notice?
Take note! Healthy tomato plants display soft, fuzzy leaves in a shade of medium-to-dark green.
If your tomato plant’s leaves are pale, yellowed, and have dark patches or ragged holes or edges, this is a problem sign.
Also, be on the lookout for dry, dusty mold or mildew growing spots on tomato leaves.
Are Your Plants Buggy?
Examine your plants for insects. Some insects are beneficial, and some are detrimental. Check with your local Cooperative Extension Service if you need help identifying the bugs you find.
The presence of some beneficial insects can indicate the presence of other detrimental insects.
For example, ladybugs on your plants can mean there are aphids or other tiny bugs present.
You do not want to kill the beneficial ladybugs because they work hard at work gobbling up and killing sap-sucking aphids.
Following these three simple steps will help you determine the cause of the problem.
The Most Common Tomato Plant Problems
There are approximately sixteen ailments that plague tomato plants.
These are variously caused by:
- Inadequate or flawed care
- Bacteria
- Fungus
7 Common Growing Conditions Found To Reduce Tomato Plant Quality and Harvest
Illnesses, fungus, and/or poor cultivation methods can severely damage or kill tomato plants. There are times when you can treat a plant and save it, but very often, it’s better to destroy the plant to prevent it from spreading the illness to your other plants.

In all cases, prevention is smarter than intervention. The best offense is to provide the ideal growing conditions to prevent the onset of fungal diseases and infection in the first place.
Pay close attention to avoid the below conditions in your tomato patch:
Lacking Fertilizer:
Provide ample organic matter in the soil and apply commercial fertilizer carefully, according to packaging instructions, throughout all stages of the plants’ lives. Check out these 5 Natural Tomato Fertilizers.
Excessive Pruning:
Tomato plants need their leaves for photosynthesis and to protect the tomato fruit from harsh environmental conditions. Learn to prune tomatoes correctly. Keep a tomato cage in place to support the plant and bear the weight of the leaves and fruit.
Calcium Deficiency:
Test your soil regularly. Maintain a pH level of about 6.5 and apply gypsum and lime to boost calcium levels and promote healthy growth. More on:
Early Planting:
If tomatoes are planted too early, they will not thrive. Check with your local extension or almanac to determine the right time for planting in your hardiness zone.
Poor Watering Habits:
Too much water promotes root rot. Too little water promotes hard, dry fruit. Provide even watering (approximately 2″ a week) throughout your growing season. Soaker hoses are great for watering tomatoes as well as watering tomatoes with the deep watering technique.
Overhead Watering:
Try not to get your plants’ leaves wet. Tomatoes’ fuzzy leaves tend to dry slowly, and this can promote the growth of fungus.
Always ground-water your plants with a soaker hose or simply allow water to run at a trickle at the base of your plants to saturate the ground.
Poor Air Circulation:
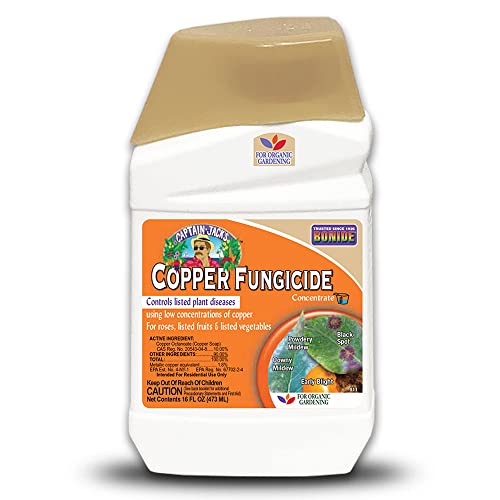
Lack of air circulation between and through your plants can also cause fungal growth. Be sure to plant tomatoes far apart to allow free growth and good air movement. If you see powdery mildew growth, apply a fungicide right away.
16 Common Tomato Plant Disease Or Ailments To Watch Out For
Blossom End Rot
Blossom end rot manifests as a black spot on the bottom of an otherwise plump, healthy tomato. Even if you cut off this bad spot, you will find the flesh of the fruit is mealy and unappetizing.
Poor watering habits or hot, dry weather may cause or worsen problems with blossom-end rot. It may also happen when plants do not get the right amount of calcium. [source]
Two reasons why this may happen. There is just not enough calcium in the garden soil, or the soil pH level is low, preventing the plant from being able to absorb the available calcium present. The pH level of your soil should be about 6.5 for good tomato growth.
To avoid the problem, test the soil before planting in the springtime. You can find a soil test kit at your local nursery or contact your Cooperative Extension for help. If you have had trouble with blossom end rot before, be sure to share this information with them.
Ask for advice, and follow it carefully. Don’t just add gypsum or lime willy-nilly to your soil and expect your calcium problems to disappear. It’s important to first test the soil, pinpoint the problem, and take appropriate steps to remedy it.
If you use organic, homemade compost in your garden, be sure to add crushed eggshells to your compost pile. This is a good source of natural calcium.
Later in the growing season, you may wish to mix up a foliar spray containing calcium chloride. Spray this on your plants in the morning so they will have all day to dry in place.
Don’t spray it when the sun is very bright, as this may cause the leaves to become burned. When you do foliar spraying, provide ground watering simultaneously. This application can help prevent blossom end rot on existing fruit.
Blossom Drop
Blossom Drop occurs when plants produce flowers that drop off before developing into fruit.
This tends to happen when outdoor temperatures fluctuate dramatically. Tomatoes are happiest at temperatures ranging from 55°-75° degrees Fahrenheit. Other reasons for this phenomenon include too little water, too little or too much nitrogen, insect damage, or a lack of pollinating insects (or lack of manual pollination). [source]
To prevent these problems, start with healthy plants. Select a setting that gets ample sun, has good drainage, and is somewhat sheltered from punishing winds. If a cold snap is predicted, cover the plants. During scorching weather, provide shade.
Attract pollinating insects to your garden (e.g., butterflies, bees, ladybugs, and others) by planting flowers and native plants such as easy to grow cosmos, milkweed, and other “pollinator garden” choices.
Avoid using chemical pesticides as these will kill off the beneficial insects and may not deliver the desired effect on the detrimental insects. Judicious application of a neem oil-based product is preferable.
Fruit Cracks
Fruit cracks usually appear as concentric circles, allowing opportunistic birds and insects to feast on the developing fruit. [source]
Poor watering habits coupled with heavy rain following a period of drought cause the cracking in tomatoes.
If your tomato plants are thirsty and heavy rainfall occurs during hot weather, the plants will take up water very quickly. This causes the fruit to swell rapidly, and the skin will crack naturally. Avoid this problem by keeping your plants properly watered at all phases of growth.
Sunscald
Sunscald affects healthy plants with plump, ripe fruit. Exposure to the excessively hot, punishing rays of the sun allows the fruit to scald, creating paper-thin yellow and white spots on tomato leaves and skin. This affects both the appearance and the flavor of the fruit. [source]

To avoid the problem, be careful not to prune plants excessively. Remember, the leaves protect the fruit from excess sun. In very hot, dry areas, you may want to use a shade cloth during the hottest part of the day to protect plants from very harsh sunlight.
Poor Fruit Set
Poor Fruit Set occurs when plants produce some flowers and very few small, flavorless tomatoes. The cause? High levels of nitrogen in the soil. Nitrogen nourishes leaf growth, but it does not nourish fruit development.
Plant crowding may also cause this problem. If plants do not have enough space, they may not be able to efficiently pollinate. Tomato blossoms contain both female and male parts, so they self-pollinate; however, they need good air circulation for pollination to occur.

Overcrowded plants impair air movement. Avoid the problem by testing the soil before planting and rectifying any imbalances. Space plants correctly (about two feet apart) to allow plenty of room for growth and good circulation of the air.
To ensure good pollination, gently shake the branches of your plants when in flower, and the petals of the blossoms are curled back. The window of opportunity for manual pollination is about three days. Keep a close eye on your plants to give them a good shaking at the right time.
Cat Facing
Cat Facing is a term used to describe lumpy, bumpy, and rippled tomatoes.
The reason for the problem is unclear, but it appears that disturbing the flowers or buds (e.g., sudden temperature drops) may be one cause. Damage from exposure to herbicides may be another. [source]
To prevent the problem, try planting tomatoes later in the season when the weather is a little warmer. You can also make use of a device known as a “Wall of Water.”
This is a collection of plastic tubes filled with water and placed in a way that encircles the tomato plant. The warmth from the water keeps the plants warm overnight.
Another way to avoid chilling the blossoms and buds and prevent weed growth is to cover the ground and area around the plants with black plastic mulch.
The plastic absorbs heat during the daylight hours and radiates it overnight. Just be careful not to leave the plastic in place after the weather becomes very hot as it could raise temperatures dangerously high.
Leaf Roll
Leaf Roll is a phenomenon that happens to mature plants. You will notice that the plants’ leaves begin rolling up from the outer edges toward the center.
This condition may strike most of the plant’s leaves, but it is not dangerous and won’t negatively impact fruit development. [source]
Excessive pruning, excessively wet or dry soil, and very high temperatures may cause leaf roll.
To prevent the problem, avoid over-pruning and provide plants with light, well-draining soil. Watch the soil moisture and water correctly. Don’t allow your plants to suffer from drought or stand in water for long periods of time.
Puffiness
Puffiness goes unnoticed until you slice into your tomato. Plants grow, bloom, set, and develop fruit just fine, but the inside of the tomatoes remains hollow.
The only clue you might have is that tomatoes will feel light when you pick them. They may also be somewhat cube-shaped instead of being round. [source]
This problem is caused by poor soil and/or lack of fertilizer, too much nitrogen in the soil, or too much rain. Inadequate pollination may also be the cause.
To prevent puffiness, amend your soil with plenty of organic compost and use a balanced fertilizer (10-10-10) once or twice a month. Top-dress the soil regularly with organic matter and feed compost tea. Remember that tomatoes need lots of nourishment to produce good fruit.
Bacterial Canker
Bacterial Canker manifests as creamy white spots on nearly ripe tomatoes. If you see a dark rim around the bacterial spots, you will know that you are dealing with a bacterial canker. [source]
This tomato disease is caused by a naturally occurring bacteria known as Clavibacter michiganensis. It is most often introduced to a garden setting by tools that have been exposed to the pathogen or by plants. Shared tomato seeds may also be contaminated.
When the bacteria invade the garden soil, they spread by rainwater or sprayed water splashing from the ground onto plant leaves and stems.
Recently pruned plants, or plants with a broken branch or insect damage, offer opportunities for the bacteria to enter the plant. For this reason, do not work in your garden immediately after a rain shower or prune your plants when they are wet.
To prevent contamination and bacterial wilt:
- Clean garden tools thoroughly with hot water and bleach after each use. [source]
- Keep new plants separate from your garden area for a week or two before transplanting them.
- Rotate crops regularly to prevent all bacteria and tomato plant diseases from being able to get a foothold.
- If you have contaminated plants, put them into sealed plastic bags for trash pickup. Don’t compost them.
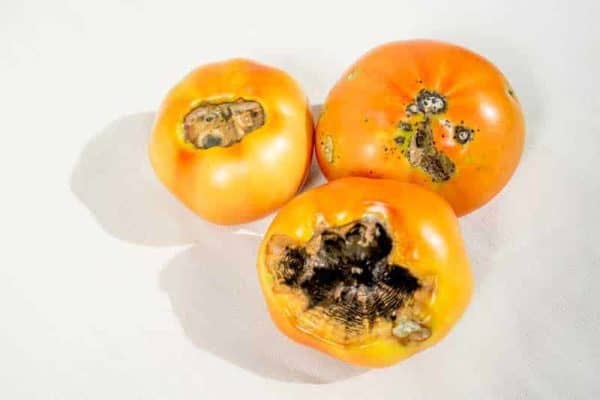
Anthracnose
Anthracnose symptoms look like blossom end rot, but instead of a solid black spot on tomatoes the bottom of a ripe tomato, you will see a bulls-eye-shaped circle. This spot will be mushy and sunken, and when you slice open the tomato, you will find mushy black rot. [source]
The fungus disease that causes anthracnose is Colletotrichum phomoides, which thrives in hot, humid weather. Using sprinklers or overhead irrigation methods facilitates the spread of this fungus as they cause it to splash up out of the soil and onto the plants.
To avoid Anthracnose diseases remember to groundwater your plants. Harvest your tomatoes promptly, allowing them to stay on the vine and giving the fungus more opportunity to infest them.
Early Blight
Early Blight shows up as brown spots on tomato leaves. The brown spots spread into rings for a target-like appearance. Foliage fades on infected plants from green to yellow in the areas surrounding the spots. Eventually, the leaves turn brown, die, and fall. In the end, your plants may be bare. [source]

This disease is caused by the fungus known as Alternaria solani which can over-winter in the garden soil. If you have this problem one growing season, you will need to take steps to deal with it before planting again. Learn more about Alternaria leaf spot.
Make a habit of rotating your crops from one season to the next as this (and other fungi and bacteria) do not thrive on all plants. Changing your plantings from year-to-year will prevent having the fungus take hold. Be advised, early blight also thrives on peppers, eggplant, and tomatoes, so don’t rotate these types of veggies in the same spot.

Late blight is another “blight” tomato battle caused by phytophthora infestans. Learn about preventing and treating Late Blight.
Related: Can You Use Neem Oil For Tomato Blight?
Septoria Leaf Spot
Septoria Leaf Spot fungus affects the bottom leaves of young infected plants. You will notice the lower foliage develops yellow spots which soon develop dark borders and gray centers.
Shortly after that, a black dot appears in the middle of the blemish, and then the leaf dies and falls. [source]

This fungus causing the problem is called Septoria lycopersici. As with most other fungal and bacterial infections, you can reduce the risk of its developing and spread by avoiding top watering your plants.
If the problem does develop, a good fungicide such as Certis Double Nickel 55™, which targets Septoria Leaf spot should help.
Fusarium Wilt
Fusarium Wilt causes sudden wilting in tomatoes and many other plants. Your tomato plants will look fine one day and be mostly or entirely wilted the next. Watering will only worsen the problem, and within a couple of days, your infected plant will be dead. [source]
A pernicious fungus known as Fusarium oxysporum f.sp. lycopersici is the problem.
The fungus resides in the soil and attacks plants’ vascular systems. It does this by destroying the xylem tubes. These are the vessels which move water and nutrients through the stems and into the leaves.
To avoid letting Fusarium take hold, be sure to rotate your crops yearly. Wilt-resistant tomato varieties have the best chance of fighting off the fungus.
Verticillium Wilt
Verticillium Wilt is another fungal infection that manifests as yellow spots on the bottom leaves of the plant. You may also see V-shaped lesions on leaf edges. [source]
Blotches spread rapidly and cause leaf veins to become brown. Soon foliage becomes brown altogether, die and fall. At this point, the disease attacks the stem and stunts plant growth.

Verticillium albo-atrum is very much like Fusarium. It dwells in the soil and is taken up by the plant with water. Rather than destroying the xylem tubes, it blocks them and prevents water from traveling normally through the plant.
As with all fungus, crop rotation can help protect your plants. Wilt-resistant varieties are somewhat able to defend themselves against Verticillium infection.
Viral Tomato Diseases
Viral Disease cause black stripes and/or spots on tomatoes. Of course, some heirloom tomatoes have natural spots and stripes. However, if you see this type of marking suddenly appear on a standard red tomato, it is cause for concern. [source]
Viruses are always present but are more likely to spread and thrive when plants are under stress. For this reason, your plants are more susceptible during drought conditions or when poorly cared for.
A plant growing in good soil and receiving the right amount of food and water is less likely to succumb to a virus than one “growing” in neglect.
To prevent viral infection, take good care of your tomato plants. If you fear your plant has already contracted a virus, treat it with a neem oil spray and give it some TLC.
NOTE: If you smoke, always wash your hands before handling or working with your plants because of the potential infection of the tobacco mosaic virus.
Powdery Mildew
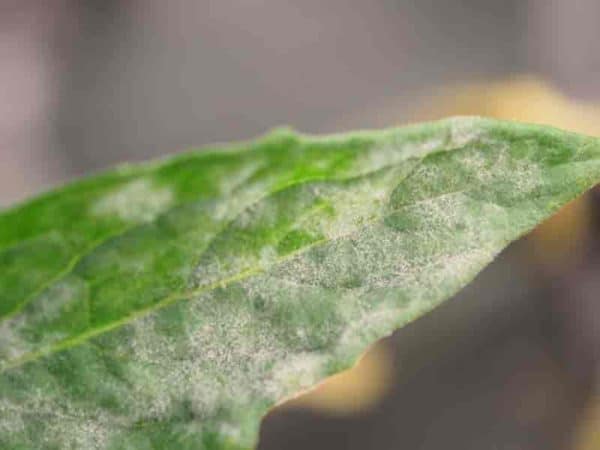
Powdery Mildew is another fungus that appears as a white powder covering the leaves and stems of your tomato plant. If ignored, it will cause the plant’s foliage to yellow and then become brown. Finally, they will fall.
This fungus is caused by a combination of high humidity and low airflow. You are more likely to see it in greenhouse plants than in garden plants. To prevent developing powdery mildew, give your plants plenty of space to grow, prune judiciously and don’t use overhead watering methods.
If you do find powdery mildew on your plants, use a foliar sulfur spray. [source]
6 Solutions For Dealing With Tomato Plant Pests
Detrimental insects can do a great deal of damage to your plants, but it is important to learn how to differentiate between the bad bugs and the good bugs.
There are lots of beneficial insects that can do a lot to help you keep your insect enemies under control.
In fact, a well-balanced garden filled with healthy plants will have little to fear from detrimental insects if a strong population of beneficial insects is in place. [source]
In addition to natural predators, here are 6 good solutions for dealing with harmful insects on your tomato plants:
Bacillus thuringiensis (B.t.)
Bacillus thuringiensis is a natural bacteria that kills caterpillars.

It is effective against tomato hornworms, tomato loving beet army worms, and other caterpillar pests; however, it will also kill butterfly caterpillars, so take care to recognize your caterpillars before applying this solution.
Establish a butterfly/pollinator garden to attract beneficial insects and relocate any butterfly caterpillars that might stray into your veggie garden.
More on Caterpillar Control with How To Keep Caterpillars Off Plants
Homemade Insect Killing Or Repelling Sprays
There are many non-toxic recipes for sprays that kill or repel undesirable insects. Use of these homemade products ensures that you are not feeding your family produce filled with pesticides. Furthermore, all-natural, homemade insect sprays can save you big piles of money.
Insecticidal soaps
These pest-killing insecticidal soaps are generally safe to use throughout the growth cycle of your plant.
These are especially effective against minuscule insect pests such as spider mites, mealybugs and aphids; however, ladybugs are also quite effective against these tiny invaders. [source]
Insecticidal Soap Containing Pyrethrin
This soap is effective against tiny pests and also larger bugs such as tomato hornworms and potato beetles.
However, big bugs can also be effectively dealt with by simply picking them off and dropping them into a bucket of soapy water on a regular basis.
Neem oil
Neem oil insecticide sprays for plants is a very safe and effective natural pesticide product that kills all manner of insects at all stages of life.
Regular spraying with a mild solution of natural neem oil and water helps keep your plant’s pest free. [source]
Insect traps
Insect Traps can work to distract pests from your plants and trap them to prevent them from ever having the chance to do damage.
Don’t use glue traps of any kind because they are notorious for catching unintended targets such as butterflies, bees, hummingbirds and other beneficial garden dwellers. [source]
5 Detrimental Pests That Will Decimate Your Tomato Plants
Cutworms
Cutworms are not really worms. They are moth larvae, and like moths, they are active after dark. They come in the night to chop down tomato plant seedlings. They do this by eating through the stems just above the soil level. [source]
To prevent this, you can outfit each seedling with a cardboard collar that encircles the entire stem. Paper towel or toilet paper cylinders cut into rings a little over an inch wide are perfect for this.
Set the ring over the plant and press it into the soil a bit to block access to cut worms. When your plant has grown several sets of leaves, you can remove the collar, or just leave it in place to decompose.
Tomato Hornworms
Tomato caterpillars are also called “Tobacco Worms.” These caterpillars are very big (2″-4″long) but they are hard to see because they are the same color and width as the stems and branches of a tomato plant. [source]
These caterpillars are very aggressive and can eat up an entire, full-grown tomato plant overnight. They work very methodically, eating all of the leaves in their path and moving on leaving a swath of bare plants in their wake.
You can treat plants with B.t. early on to kill off hornworms as they emerge, and/or you can attract parasitic wasps to your garden to deal with them. Beneficial wasps lay their eggs on hornworms. When the eggs hatch, the wasp larvae eat the caterpillar. [source]

Companion planting is also a good way to deal with hornworms. Try planting marigolds amongst your tomato plants as they naturally repel hornworms.
Colorado Potato Beetles
The Colorado Potato beetle eat all members of the nightshade family (potatoes, tomatoes and eggplant). These sporty looking dime-sized devils are orange/yellow and black striped and gobble up nightshade leaves with impressive rapidity. [source]
Their larvae are also voracious and eat entire plants, stems, and all.
The larvae are red or pink with black spots. You may see them hiding on the undersides of the leaves during the daytime. You can also find yellow or gold clusters of Potato Beetle eggs on the undersides of leaves.
Pyrethrin spray and neem spray are both effective against the larvae and the adults. You can also shake the adults and larvae off the plants into a bucket of soapy water.
Examine the undersides of leaves and clip off any leaves with egg clusters. Put these leaves into a sealed plastic bag and dispose of plant debris in the trash.
TIP: Be careful not to mistake clusters of beneficial ladybug eggs for detrimental potato beetle eggs! [source]
Brown Marmorated Stink Bugs
The Brown Marmorated Stink Bugs are problematic in the home and in the garden. These large, bizarre looking bugs have straw-like mouth parts which they use to suck liquids out of fruits.
When they damage your tomatoes, you will see yellow blemishes and uneven areas on the skin of ripening tomatoes. When you slice a damaged tomato open, the areas that have been damaged by stink bugs are white.
These bugs seem to be resistant to most pesticides. [source] `
To deal with stink bugs, you can purchase specially made traps from Safer® Brand. You should also take steps to prevent them from getting a foothold.
Because the bugs like to hide out and breed in homes and outbuildings, be sure to seal cracks and crevices.
Pick the bugs on tomato plants off as you see them and drop them into soapy water, but wear plastic, disposable gloves to do so and be careful not to inhale their scent. Contact with them can irritate the skin and nasal passages. [source]
Spider Mites
Spider Mites are very small, but they do a lot of damage. They congregate on the leaves and stems of plants and suck the juices out leaving patchy, brown scars behind.
Neem oil spray and insecticidal soap are both effective in getting rid of spider mites. A healthy ladybug population will also make short work of them. [source]
Birds, Terrapins & Some Lizards Like To Eat Tomatoes
Tomatoes are tasty and all manner of wildlife will enjoy them if they can get to them. Birds will land on the plants and peck at the fruit.
If you are lucky enough to have terrapins in your yard, they may take a few bites out of low-hanging fruit. If you live in a tropical area with large, veggie eating lizards, they will gladly eat your tomatoes. Deer and chipmunks also like tomatoes.
Physical barriers will keep critters out of your tomatoes. A low wall will prevent terrapins from getting in, a tall fence will keep deer out.
Sturdy netting can keep birds, large lizards, and small mammals out, but be sure it is strung tightly on sturdy poles. Loose netting presents an entanglement hazard to birds, lizards, and small mammals. They can get caught and break legs and wings.
Setting up a wildlife-friendly garden is also a good way to deal with hungry wildlife. [source]
Many people just let a sort of wild veggie garden spring up from extra seedlings and castoff plants in a removed location. Near a compost heap is a good setting. This sort of out-of-the-way setting is also ideal for your pollinator garden.
Don’t Be Afraid! Tomatoes Are Easy To Grow!
After reading this long list of tomato problems, you may feel a bit daunted at the prospect of attempting to grow them. Don’t be.
The bottom line when growing tomatoes or any garden plant is that healthy, well cared for plants tend to deflect disease and pests, so if you take good care of your plants, your battle is half won.
For more information and good visual aids, download this handy PDF from the Missouri Botanical Garden.