
Few houseplants hand you free plants the way a spider plant (Chlorophytum comosum) does. Those little “spiders” dangling from the long stems are ready-made baby plants, and many start growing roots before you ever cut them.
The spider plant is one of the most common houseplants, and it is especially popular for the ease and speed with which it forms new plants. It is very easy to grow and propagate and tolerant of neglect.
You have four ways to make more: root the babies while they are still attached, cut the babies off and pot them, root the babies in water, or divide a crowded plant. Seed is a fifth, slower option. Here’s how each one works.
Where Spider Plant Babies Come From
The babies grow on the plant’s flower stems. Mature plants send out long, wiry stems up to 2 feet long that end in small white, star-shaped flowers. After flowering, more leaves form at the ends of those stems, making the small plantlets. Missouri Botanical Garden says the plantlets form at the flowering nodes. Spider plants produce their plantlets, or offsets, after flowering.
Many of them come pre-rooted. UF/IFAS Gardening Solutions describes the long shoots as developing pre-rooted plantlets at their tips, and NC State Extension’s page on ‘Variegatum’ says the plantlets form aerial roots as they mature. Those little root nubs are your head start.
Want a full basket instead? You can detach the plantlets to make new plants or leave them on to create a very full hanging basket. Your choice.
Method 1: Root the Babies While They’re Still Attached
This is the gentlest method, because the baby stays attached to the mother plant while it roots. University of Wisconsin Extension describes it this way:
- Fill a small pot with soilless potting mix and set it next to the mother plant.
- Set a plantlet, still attached to its stem, on the surface of the mix.
- Hold it in place with a bent paper clip or a piece of wire so it stays in contact with the mix until it roots.
- Once it has rooted, cut the stem that connects it to the mother plant.
New plantlets root readily when they come into contact with soil. Keep the small pot moist while the baby settles in. A gentle tug that meets resistance tells you roots have taken hold.
Method 2: Cut the Babies Off and Pot Them
No room for extra pots beside the mother plant? Cut the babies off instead. Removing and potting a plantlet that has already started developing roots is another common method: simply remove and pot the plantlets.
- Pick babies with roots. Detach plantlets once roots have formed.
- Or pin them down. Detach good-sized offsets once they have their own roots and pin them into pots of moist compost with a U-shaped piece of wire.
- Pot them straight into moist mix. Pot them directly into moist growing mix. Spider plant runners are very easy to root, so pot them directly in soil mix.
- Press gently. Set the base of the baby just into the mix and firm it so it stands upright.
- Give it bright, indirect light. Spider plants grow best in bright, indirect light, and midday sun may scorch the leaves; the plant is often called intolerant of direct sunlight. More on what lighting spider plants need.
When is the best time? Any time of year. You can start new plants from the plantlets at any time of year, and University of Missouri Extension lists the spider plant among the houseplants that are easy to propagate at home.
Method 3: Root Spider Plant Babies in Water
Want to watch the roots grow? South Dakota State University Extension says you can place an offshoot in water for a couple of weeks to encourage more root growth before planting it in soil. Colorado State University Extension also says plantlets can be rooted in moist potting soil or water. Or detach the spiderlings, place them in a glass of water and pot them up individually once their roots lengthen.
Keep the leaves above the water line so only the base sits in the water, set the glass in bright, indirect light, and top up or change the water if it turns cloudy. Then plant the baby in potting mix.
Water is a rooting step here, not a permanent home: move the rooted baby into soil.
Method 4: Divide a Crowded Spider Plant
Division is the way to go when the plant itself is packed into its pot. Spider plants form thick, fleshy tuberous roots, and Clemson Extension says to divide and repot plants before the roots expand enough to crack the container. Spider plants need repotting or dividing more often than many other houseplants, because their fleshy roots can push the plant out of the pot or even break plastic pots.
- Timing: Spider plants can be repotted at any time of year. The RHS suggests repotting and dividing every 2 to 3 years, or replacing an old plant with a young plantlet.
- How: Slide the plant out of its pot, tease or cut the clump into sections that each have leaves and their own roots, and pot each section in fresh mix. If the thick, fleshy roots won’t pull apart, slice through the clump with a knife, and repot healthy pieces that each have at least one growing point. Division is particularly useful for cultivars that don’t produce offsets.
- Pot size: Spider plants grow and produce plantlets best when slightly pot bound, so choose a pot only a little larger than each division’s roots.
Division gives you full-size plants right away, which is handy when you want to share a big spider plant rather than wait for babies to grow. More on how to repot a spider plant.
Can You Grow Spider Plants From Seed?
Yes, but expect surprises. If a flower is pollinated, the plant makes a leathery, 3-angled capsule containing flat black seeds. Spider plants can be grown from seed, but the seedlings will not necessarily have the same leaf coloration as the parent. Seed is a recognized way to propagate.
So if you want an exact copy of a striped variety, stick with babies or division. Seed is for the curious.
Why Isn’t My Spider Plant Making Babies?
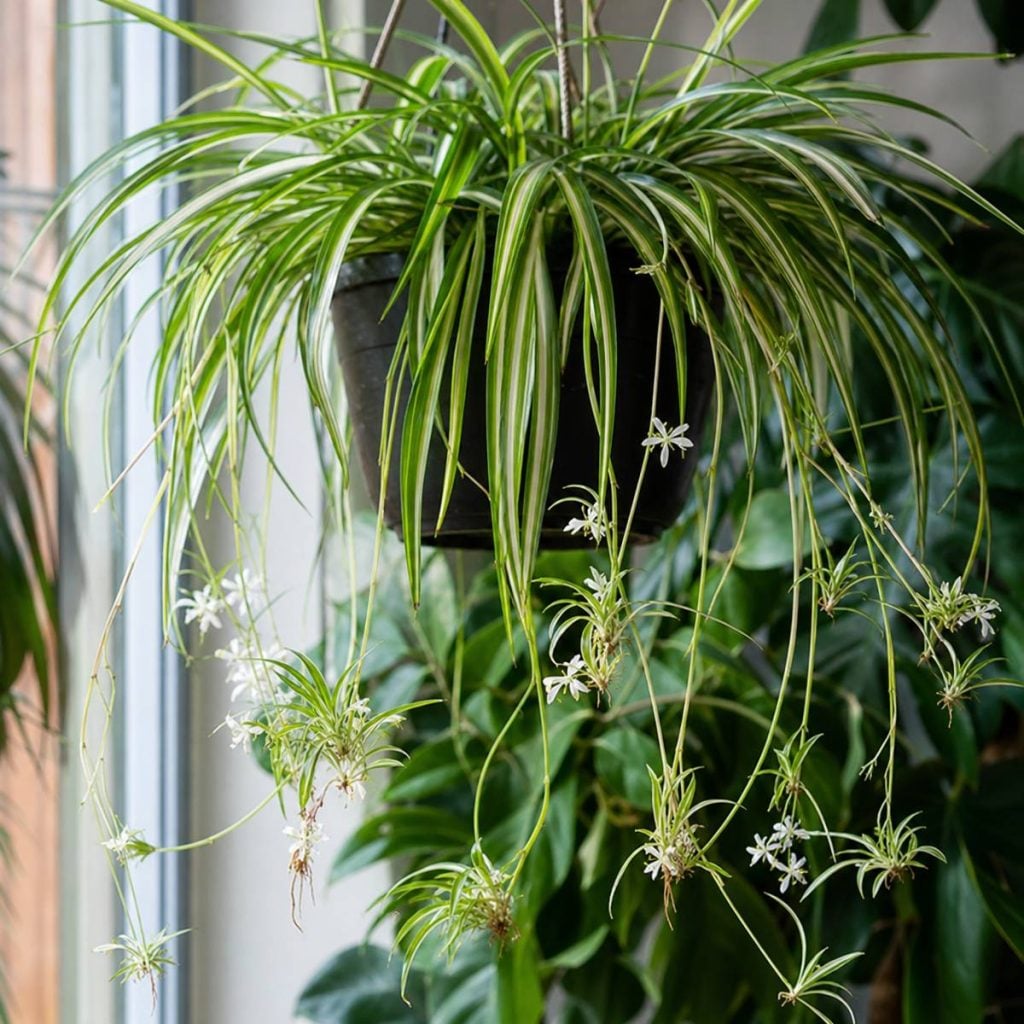
No babies usually means no flower stems yet. Here’s what the extension services say affects them:
- Day length. The stolons and plantlets are light dependent and develop when the mother plant gets short days and long, uninterrupted nights, less than 12 hours of light a day, for at least three weeks. Spider plants produce most of their offshoots when the days shorten in fall. Indoors, though, the stems may appear at any time of year.
- Too much fertilizer. Over-fertilizing decreases plantlet formation, and heavily fertilized plants may not form as many new plantlets.
- A roomy pot. Plants grow and produce plantlets best when slightly pot bound, and University of Illinois Extension says spider plants produce plantlets when potbound.
- Low light or a cool room. Too little light and cool temperatures, along with an overly large pot, can discourage flowering.
- Variety. ‘Variegatum’ (green leaves with white margins) tends to produce fewer plantlets than other types. Some cultivars, including Chlorophytum capense ‘Variegatum’ and C. orchidastrum ‘Green Orange’, don’t produce offsets at all; division is the way to multiply those.
- Age and health. The long, wiry stems appear on healthy, mature plants. Most spider plants won’t flower or produce plantlets until they’re at least a year old.
Caring for Your New Spider Plants
Young spider plants need the same simple care as the parent:
- Potting mix: A general-purpose potting soil with good drainage, or a soilless medium, works. Root rot usually comes from a mix that does not drain quickly or from too much water. More on soil for spider plants.
- Water: Spider plants should be allowed to dry out briefly between waterings. For a measure, let the upper inch of soil dry out briefly between waterings. Spider plants dislike standing in water, so pour away any excess.
- Water quality: Spider plants are particularly sensitive to fluoridated water, and rainwater or distilled water is best if your tap water is fluoridated. The chlorine and fluorides in tap water can cause leaf tip burn.
- Light: Spider plants can tolerate some direct sunlight, but midday light may scorch leaves, and the plant is often called intolerant of direct sunlight. I’ve photographed spider plants growing in full sun at neighbors’ homes, both as an in-ground groundcover and in pots. For new babies, stick with bright, indirect light. One note for Florida gardeners: an assessment of non-native plants in Florida’s natural areas predicted the spider plant to become invasive in Florida, and it is no longer recommended there.
- Feeding: Hold off. Wait four to six months before feeding a newly potted plant. After that, feed during active growth with a water-soluble or time-release houseplant fertilizer, following the label. Excess fertilizer may lead to tip browning.
- Temperature: Keep temperatures above 45°F. Ideal is 65 to 75°F during the day and 50 to 55°F at night, and moving spider plants a few feet from windows in winter protects them from drafts. Temperatures below 55°F are also called too cool for spider plants, and above 80°F too warm.
Commercial growers watch the same things. A foliage research note for Florida growers says to use irrigation water and potting components free of fluoride and boron, and to keep the potting medium at a pH of 6.0 to 6.5 to reduce the availability of those elements.
Are Spider Plants Safe for Pets?
Good news for anyone with curious cats. The ASPCA lists the spider plant as non-toxic to dogs and cats, and it is also tagged as non-toxic for horses. That makes spider plant babies an easy plant to share.
Share the Wealth
One healthy spider plant can stock a whole neighborhood. Pin a few babies, cut a few more, and pass them along to friends, family and coworkers. Anyone with a flourishing spider plant will usually be happy to share some of its offspring.
How many spider plant babies are you rooting right now? Tell us in the comments!
Frequently Asked Questions
How do you propagate a spider plant?
The easiest way is from the babies (plantlets) on the long stems. Set a plantlet, still attached, on a pot of soilless mix, hold it down with a bent paper clip and cut the stem once it roots. You can also cut off babies that already have roots and pot them, or divide a crowded plant.
Can you root spider plant babies in water?
Yes. You can place an offshoot in water for a couple of weeks to encourage more root growth before planting it in soil, and plantlets can be rooted in moist potting soil or water.
When should I cut the babies off my spider plant?
Once they have roots. Detach plantlets once roots have formed and pot them directly into moist growing mix; you can start new plants from plantlets at any time of year. If you are rooting a baby while it is still attached, wait until it has rooted before cutting the connecting stem.
Why is my spider plant not producing babies?
It may not be getting the right cues. Plantlets develop after at least three weeks of short days and long, uninterrupted nights, with less than 12 hours of light a day, and over-fertilizing decreases plantlet formation. Plants produce plantlets best when slightly pot bound, and ‘Variegatum’ tends to produce fewer of them. Most spider plants won’t produce plantlets until they’re at least a year old.
Can you grow spider plants from seed?
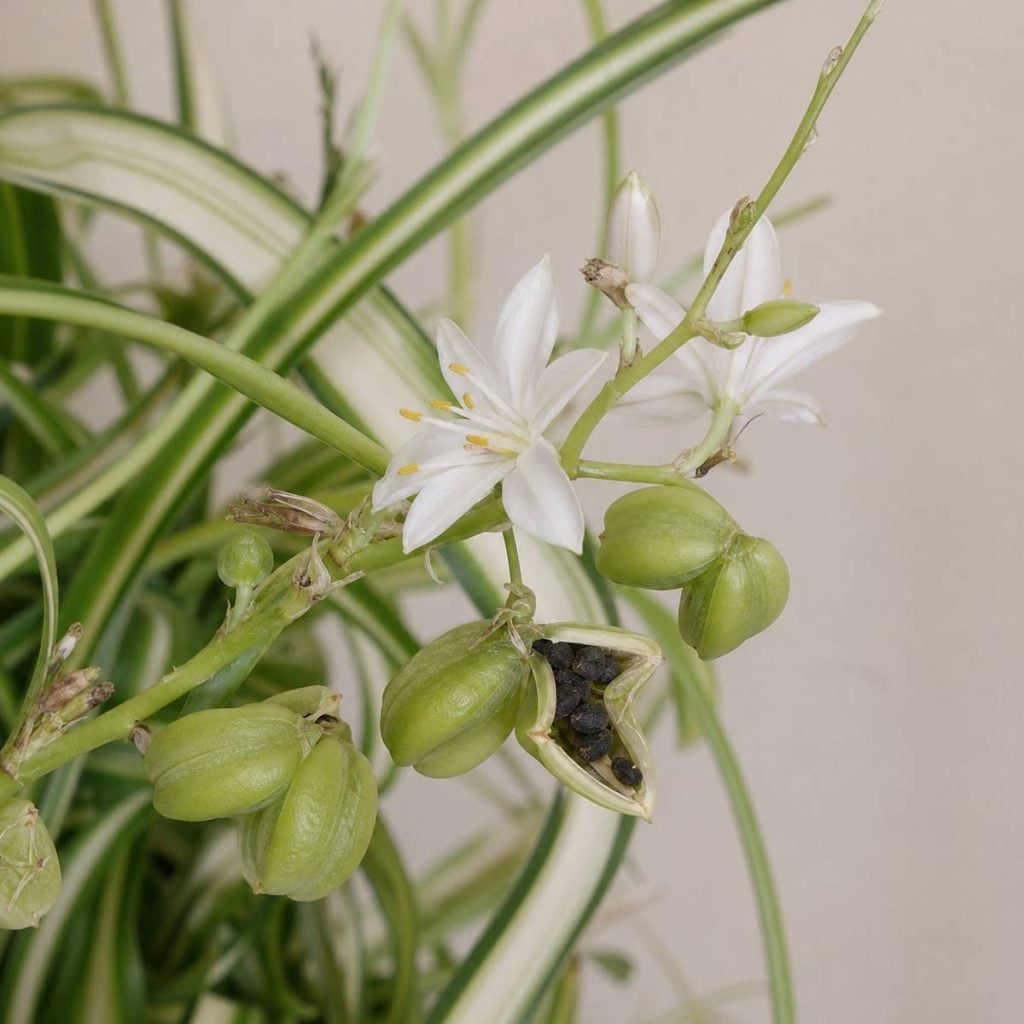
Yes, but the results vary. Pollinated flowers form a 3-angled capsule with flat black seeds, and spider plants can be grown from seed, but seedlings will not necessarily have the same leaf coloration as the parent. For a copy of a striped variety, root the babies or divide the plant instead.