Caladiums are very attractive tropical perennial plants hailing from South America and Central America. Most Caladiums we see in the United States come from Brazil.
These colorful plants are members of the Arum family (Voodoo Lily is a relative), and you can find thousands of cultivars to choose from.
Although these heat loving plants are only winter hardy in zones 9 through 11, they can be successfully grown or kept as houseplants in all zones with proper management.
- The Illustrious History Of The Caladium
- Varying Types of Caladiums
- Do Caladiums Have Flowers?
- Caladiums Enhance Floral Arrangements
- Where Can You Grow Caladiums?
- What About Planting Under A Tree?
- How Much Light Does A Caladium Need?
- Caladiums As Houseplants & Container Plants
- What Kind of Container Is Best for Growing Caladiums?
- When Is the Best Time to Plant Caladium Tubers?
- Where To Purchase Caladiums Bulbs?
- What's the Best Way to Plant Caladium Tubers?
- Growing Caladium Bulbs In A Flowerbed
- Caring For Caladiums
- Caladium Culture
- Why Grow Caladiums?
Caladiums are related to the large, green Elephant Ear plants that thrive in semi-tropical areas of the United States. You may hear them referred to as Elephant Ears or Angel Wings.
Make no mistake. Caladiums are far more exciting than plain, green Elephant Ears! Caladiums are a vast improvement over old-fashioned Elephant Ears (New varieties here). There’s a whole lot more choice in color, size, shape and use.

Caladiums are useful as potted plants or bedding plants, and their decorative foliage has a definite and permanent place in floral arrangements.
Even the early wild versions were colorful and enchanting and drew the attention of top horticulturists and plant explorers of the 1700s! This interest continues to this present day, resulting in thousands of cultivars available.
In this guide, we will share a brief history of the Caladium. We will also discuss some of the more popular varieties. Plus, we will provide information and resources to help you make the best choices for using Caladiums in your garden setting.
You will also receive advice on planting, caring for, and over-wintering your Caladiums.
In this article, you’ll learn:
- How to plant Caladium bulbs
- When to plant Caladium bulbs
- How to grow Caladiums
- How to store Caladium bulbs
- How to care for Caladiums
The Illustrious History Of The Caladium
The Caladium variety with which we are most familiar originated in Brazil. Over the past century and a half, some enthusiastic and notable horticulturists and hybridizers have worked to develop the many variations of the Caladium available to us today.
Most of their work took place toward the end of the 19th century and into the early 1900s. Because their accomplishments were made so long ago and because plant progress does not tend to be big news.

Most modern-day Caladium enthusiasts are unaware of the interesting and complex path these tropical plants followed to become the favorite garden plants we know today.
The Caladium was originally discovered in the wilds of Brazil in the late 1700s by French plant explorers. Early wild varieties included:
- Caladium bicolor
- Caladium verscholfelti
- Caladium baraquini
- Caladium humboldt
- Caladium chantini
The earliest Caladium hybridizer was Frenchman, Louis Van Houtte. During the 1850s, he worked with these wild Caladium species to develop the precursors of the thousands of varieties available to us today.
Subsequently, a European Caladium breeder by the name of Alfred Bleu created the dazzling white variety known as Candidum. This lovely plant, with its white leaves decorated with green veining and borders, is still a favorite today.
The first public showing of the Caladium took place in 1867 at the French Exposition, and the plants have been growing in popularity and variety ever since.
One of the most popular varieties at this exposition some 150 years ago was the Triomphe de l’Exposition (Triumph of the Exposition), which is still available today.
One of the very early contributors to the development of the Caladium was Cincinnati florist Julius A. Peterson. Julius first saw the colorful plants at the Philadelphia Centennial Exposition in 1879 and was immediately taken by them.
This early exhibit of the plant in the US was comprehensive and fascinating. Images and accounts of it are of particular interest to modern-day Caladium enthusiasts.
One of the earliest and most important hybridizers of Caladiums was Dr. Henry Nehrling. He was an intrepid and pioneering plantsman who lived in Gotha, Florida (near today’s Disneyworld) in the early 20th century. He became one of the leading hybridizers in North America.
Dr. Nehrling first encountered the Caladium in 1899 at the Chicago World’s Fair. He saw a collection of a hundred different varieties on display by Adolph Lietze, a gentleman from Rio de Janeiro, who was known as the “Caladium King”.
Lietze had relocated from Germany to Rio de Janeiro, where he became immersed in hybridizing and developing these beautiful plants in their native setting.
In the warm, humid climate of Rio de Janeiro, Lietze cultivated the very best performance using some of the top hybrid varieties obtained in Europe. Mr. Lietze used many of the varieties developed by Mr. Bleu when creating his variations.
All-in-all, Lietze developed around a thousand new varieties. Some of his most notable were:
- Mrs. John Laing
- Rio de Janeiro
- Hortulania
- Itapocu
- Aguape
- Bahia
Dr. Nehrling followed Mr. Lietze’s lead and introduced a broad palette of brightly colored Caladium variations. He had the quaint habit of naming his creations after his friends, relatives, acquaintances and colleagues.
Here are the true names of some of the types he developed:
- Mrs. Fannie S. Munson
- Mrs. Arno H. Nehrling
- Mrs. Henry Nehrling
- Marion A. McAdow
- Stuart H. Anderson
- Richard F. Deckert
- Dr. George Tyrrell
- Mrs. B. Haldeman
- Jesse M. Thayer
- Betty Nehrling
- Zee Munson
You can surely find these types among the vast assortment of Caladiums available today; however, they are unlikely offered under their true, original names.
Back in the heyday of world travel and plant discovery, when Florida was still a wild and unspoiled place, Dr. Nehrling was able to gather, plant and grow 200,000 plants on his property every year.
I’m sure Dr. Nehrling would have enjoyed having this ProPlugger bulb planting tool!
Visitors to Dr. Nehrling’s property recounted an overwhelmingly beautiful riot of color, patterns, and shapes. He developed and named over 2000 varieties.
His contributions to the number and quality of tubers available to us today is still apparent and incomparable.
Another Floridian (and colleague of Dr. Nehrling) by the name of Theodore L. Mead also developed an impressive number of new Caladium varieties. Some of his most notable were:
- Mrs. Theodore L. Mead (Edith Mead)
- Mrs. Jennie S. Perkins
- Charles T. Simpson
- Hildegard Nehrling
- Pliny W. Reasoner
- Bertha S. Eisele
- Blanche Wise
- D. M. Cook
Mr. Mead joined efforts with Mr. Lietze to develop the lance and arrow-leaved varieties. They did this by crossing standard varieties, which bore heart-shaped leaves, with several narrow-leafed varieties.
This cross brought out the best of both parent plants. A combination of bright colors and unusual patterns added a whole new dimension when imposed upon a smaller and differently shaped palette.

Leaf shape was not the only thing different about these intriguing crosses. The new, lance, or arrow-leaved varieties were also smaller than standard Caladiums, so they found a use in a wider variety of settings. These dwarf varieties made good choices for planting in pots, containers or window box planter.
A number of botanists and plant enthusiasts built on the work of the early hybridizers in the first decade or so of the 20th century. Most notable of these was a gentleman named Richard Hoffman, who created some very popular varieties, such as:
- Thomas Tomlinson
- Scarlet Pimpernel
- Ace of Hearts
- Marie Moir
- Red Ensign
- Rising Sun
Hoffman was a well-to-do English gentleman. He possessed the time and resources to produce as many as 25,000 plant seedlings of many types annually in his greenhouses on his estate.
His head gardener, Thomas Tomlinson, managed the caladium tubers, hence the name of one of the Hoffman Caladiums.
Today the capital of Caladium Bulbs is in Lake Placid, Florida where they have a Caladium Festival every year.

Varying Types of Caladiums
Growing conditions vary considerably from one area of the US to another. Caladiums themselves vary in size, shape, color and hardiness making it sometimes difficult to predict what sort of color and condition you can expect.
There are two basic types of Caladiums. They are:
Fancy Leafed Type Caladiums: They come equipped with very large and elegant heart-shaped leaves (or nearly so) on long stems. This type is usually between one and three feet tall.
Lance or Strap Leaf Caladiums: These compact versions are smaller, thicker, and narrower, often reaching only a height of one foot. The leaves are long, slim, and more abundant than those of the Fancy Leafed variety.
This type of plant tends to produce more leaves makes them an excellent choice for a pot or a window box.
One good example of this type is the Caladium humbolti, which sports silvery green and white foliage. Other small and dwarf types exhibit very delicate and even lacey foliage.
Heart-shaped leaf varieties are best for large container planting and mass plantings in large spaces because they grow tall and abundant. Choose your favorite colors and plant bunches of them for the greatest visual effect.
For smaller planters, window boxes, and houseplants, the strap-shaped or lance-shaped types are better. They grow shorter and denser.
You can also find dwarfed heart-shaped varieties, which make beautiful plants for pots, small containers, and window boxes.
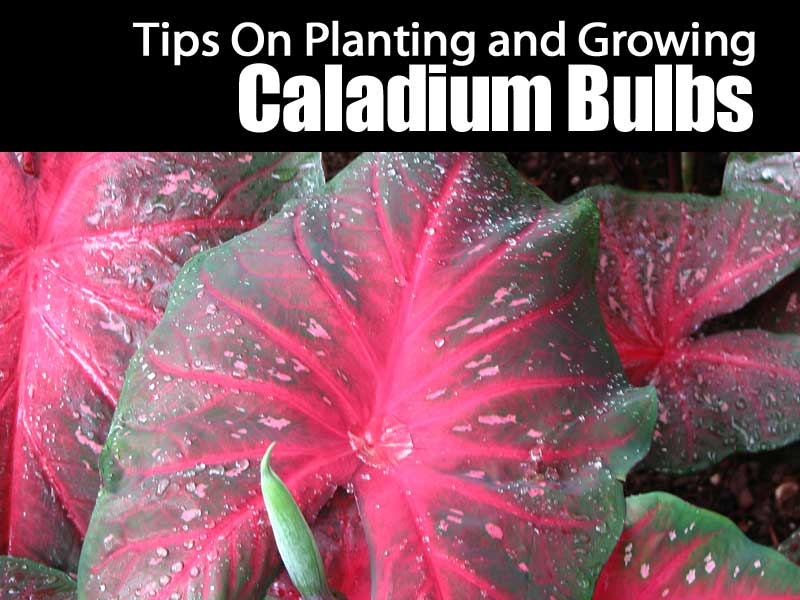
Caladium Bi-Color presents the most colorful foliage of all. Color combinations include:
- Red and Pink
- White and Green
- Yellow and Green
There is also a tremendous variety within these in color combinations. Many have very prominently colored veins and mid-ribs and margins of a contrasting color.
Caladiums Bi-Color is one of the originals and has remained a hugely popular variety since the discovery of these enchanting plants. Bi-color is readily available at most garden centers and nurseries throughout the United States.

This type of Caladium has an oval or an arrowhead-shaped leaf. With so many hybrids of this type, it is easy to create a varied shady place garden.
There are also stunning white and pink varieties such as Candidum. This variety does not produce many leaves because it has very few buds per tuber.
Some other lance-shaped leaf varieties include White Wing and Rosalie. These varieties produce far more abundant foliage; however, their leaves are rather smaller and thinner.
Some types of Caladiums have very solid, thick leaves. Still, others bear quite delicate and almost transparent leaves. In some, the colors and patterns are so intricate and brilliant they are reminiscent of stained glass.
If you want an abundant, lush, tropical appearing garden, Caladiums are the ticket for you. Leaf size is also quite variable.
Caladiums are widely available in nurseries across the US in a wide array of colors ranging from very pale white light to brilliant red leaves bordered by green. You are sure to be dazzled by the many choices available.
ClassicCaladiumsllc.com provides a comprehensive list of Caladium types arranged by color, size, shape and sun requirements.
Do Caladiums Have Flowers?
The foliage of Caladium plants is the main calling card, but they also bear flowers. These flowers come in the form of an inflorescence. This botanical term means a grouping of many small flowers. They look quite a bit like Jack-in-the-puipit, or the stamens of the calla lily plant or exotic anthuriums, which are close relatives.
The inflorescence of a Caladium is made up of a central column which bears a multitude of tiny flowers. Sometimes Caladium flowers will rise above the foliage, but more often than not they are unnoticeable as they remain hidden in the leaves.
Flowers are usually cream-colored, but occasionally they bear streaks of the colors found in the leaves of the plant. These modest blossoms are short-lived. After a day or two, clip the Caladiums inflorescence as it will begin to lose its attractive appearance.
Caladiums Enhance Floral Arrangements
Even though their flowers are modest, Caladium leaves find their way into floral arrangements because of their unusual shapes and colors. They look especially good with flowers such as:
- Amaryllis bulbs
- Geraniums
- Viburnum
- Phlox
- Asiatic Lily Bulbs
Along with their various leaf shapes, bright shorter, narrower leaves are especially attractive in floral arrangements. The cut leaves will stay fresh for several weeks if kept in clean, room temperature water. Always use filtered water because it is free of chemicals.
You can also use living Caladium plants in floral arrangements. Simply shake the dirt off the tubers, rinse the tubers and wrap them in damp sphagnum moss. You can use this living ornamentation as a centerpiece for a floral arrangement.
Just change out the cut flowers as needed while keeping the living centerpiece as-is. The Caladium will stay alive and healthy indefinitely.
Where Can You Grow Caladiums?
Caladiums are natives of tropical America. In the United States, you will usually find them grown in greenhouse settings and garden settings in warmer areas. If you can provide a warm setting on a consistent basis, you can grow Caladiums.
If you live in a very warm area such as USDA Zones 9-11, planting Caladiums is incredibly easy. You can plant them directly into a well-prepared bed and enjoy them throughout the growing season. In other areas, start your Caladium indoors in pots to give them a head start on the growing season. You can transplant them outdoors after all danger of frost passes.
When choosing a place to plant your Caladiums look for a shady area with rich, fertile soil and good drainage to plant these tropical tubers. The best result will come from planting in soil rich in humus, with a soil pH somewhat acidic.
The most popular varieties originate from Caladium Bi-Color. These summer bulbs provide very dramatic foliage in the summertime.
Sun hardy, dwarf varieties make the perfect choice for creating a mailbox garden to add charm and curb appeal to your home. These compact varieties make a very colorful addition planted along a pathway or in containers at your front door.
Choose Caladiums in a variety of heights to create tiers in front of a wall. Smaller specimens make good choices for window boxes and pots indoors.
To simplify your Caladium care, plant several tubers in a single 6 to 8-inch pot and then simply sink the pots into your well-prepared bed. This helps protect the roots and helps individual pots retain moisture better. In the fall, simply lift the pots out of the ground to collect your tubers. In the long run, this saves a great deal of backbreaking labor.
Also, another good reason to grow Caladiums in pots gives you the ability to move pots around as needed to create impact. This is also helpful if your plants “live” in an area that sometimes experiences chilly evenings but bright sunny days. Set your plants out during the daytime and then move them to a warmer area in the evening.
What About Planting Under A Tree?
Plant Caladiums around a tree can be a good idea. However, keep in mind you will need to be able to dig a bed at least five inches deep. This may interfere with root growth.
You can always build up the soil or create a raised bed garden. Just be careful not to build up the soil around the trunk of the tree as you may kill the tree. Give the tree at least a foot of breathing space all the way around.
It is important to keep the taller, fancy leafed Caladiums in a sheltered area as heavy rain and hard wind can damage them.
Caladiums do very well when planted under oak trees. This setting provides them with filtered sunlight. Having a line of shrubs a fence or wall nearby to act as a windbreak is also a good idea. These plants make an excellent companion for a wide variety of bushes, evergreens, and shrubs.
Other good companion plants for Caladiums include:
- Summer Blooming Oxalis
- Helleborus Corsicus
- Clematis Manchuria
- Tuberous Begonias
- Sedum Sieboldi
- Wax Begonias
- Platecodons
- Sultana
You can create a stunning shady place garden with a combination of Caladiums, coleus, and ferns. Caladiums are also a good choice for planting around the edges of your patio or in containers at poolside on your porch or deck.
How Much Light Does A Caladium Need?
Most Caladiums like light shade, but some new varieties do very well in direct sunlight. As your Caladium collection grows, you can break up bunches of tubers and try them in a variety of locations to determine the best place and conditions on your property to grow them.
These versatile tubers are available in types that flourish in deep shade, partial shade or even full sun. When making your selections, pay close attention to the qualities found in the types of tubers available.
Certain kinds do well in all sorts of settings, but your results often depend on the amount of light you can provide.
For example, some will grow quite well in full sun but will lack the vivid coloring they would produce in partial or full shade. If in doubt, make a reasonable choice and provide your planted tubers with partial shade. It is a good idea to protect Caladium plants from the harsh sun, but there are exceptions.
Some new Caladium varieties handle the sun well or even appreciate of sun. These varieties do well in 6 to 8 hours of sun daily. Remember, even sun hardy Caladiums require lots of water. You’ll need to check them for moisture more often when placed in the sun. You may need to install a soaker hose or automatic watering system to keep your Caladiums well watered.
When exposed to too much sun, Caladiums may end up with holes in the leaves and browning along the edges. Generally speaking, brighter colored Caladiums do better in the sun, and produce more color with greater sun exposure. Water sun tolerant caladiums in the evening to help retain moisture and prevent sunburn.
If you have a shady yard, the traditional choices such as Bi-Color provide bright color in dark places and deliver it all summer long. There are also some beautiful white varieties such as “Moonlight” and “White Christmas” that look gorgeous and lighten and brighten your yard throughout the summer months. This is true even when grown in deep shade.
Caladiums As Houseplants & Container Plants
If you receive nice potted Caladium as a gift, keep it healthy and strong by misting it often when it adjust to its new environment. Remember, the plant probably just came from a humid and climate controlled greenhouse setting. Air in your home is bound to be drier, but if you keep the plant well misted it should adjust quickly.
You can keep Caladiums in the house year-round as houseplants. Start tubers off in small pots and move them gradually into larger pots. Slowly “stepping” plants up is much wiser than simply setting a tuber in a large pot on its own. Doing so often encourages excessive root growth and little leaf growth.
Begin by choosing a pot just big enough for the tuber. When you see the plant becoming root bound, move it into a slightly larger pot.
Placement of houseplants can be a little bit tricky. Remember, too much sun will cause the color to become dull. With too little sun you may get more vibrant color, but growth may suffer.
When growing a potted Caladium indoors, you must keep a very close eye on your watering. It is especially important to keep the soil lightly moist but not soggy.
What Kind of Container Is Best for Growing Caladiums?
The hardy, cheery Caladium does well no matter what as long as you provide plants with a good well-drained soil, the right amount of moisture, good water-soluble fertilizer, and proper environment. A good soil mix will promote quick growth, brilliant colors and lots of leaves regardless of the container type.
Clay pots are always good. Many enthusiasts who collect dozens (if not hundreds or thousands) of Caladiums of every shape, size, color and style may find the cost and acquisition of clay pots rather challenging.
Folks who grow them in large numbers use containers ranging from clay pots to tin cans. If using a metal container, it’s wise to line it with a plastic bag to prevent the container from rusting and to protect the roots and tubers.
No matter what sort of container you use, be sure to put a 1-inch layer of broken crockery, rocks or some other good drainage material in the bottom of each pot before adding planting mixture and tubers. Make certain the container has ample drainage holes at the bottom.
When starting Caladium tubers in small pots, place them under a good light source and continue to keep the temperature between 65 and 75° degrees Fahrenheit. Mist frequently to prevent excessive dryness.
When Is the Best Time to Plant Caladium Tubers?
One rule of thumb is to plant your Caladiums after Mother’s Day to be sure there is no potential danger of frost.
Consult your local almanac or weather channel carefully to determine the exact planting time for your area. It’s also a good idea to check with local Caladium enthusiasts to find out what works best for them. Anecdotal experience is sometimes the most reliable experience.
Generally speaking, you can plant Caladium tubers outdoors when the weather becomes reasonably warm and predictable. Many enthusiasts recommend planting your Caladiums at the same time as you plant your tomatoes. In the northern states, put them out just before you set out your tropical water lilies.
Where To Purchase Caladiums Bulbs?
What’s the Best Way to Plant Caladium Tubers?
Even in zones 9-11, it is usually smartest and more traditional to start your caladium tubers indoors and let them become well-established before putting them outdoors. Doing this will give you a more brilliant color display sooner. Generally speaking, you can start your tubers indoors about eight weeks before you plan to set them out.
After all danger of frost passes, put your Caladium plants outside in the garden bed. Whether you live in the northern or southern United States, starting your plants in pots is usually the better choice.
It may seem like a no-brainer, but always be careful to plant the tubers right side up. Caladium bulbs can be a little bit confusing. Remember the bottom side is smooth, and the bumpy part goes on the top. The little knobs are the eyes or growing points of the plant.
If it’s hard to tell which side is up, don’t worry about it too much. Even if the tubers get planted upside down, they will grow. It will just take a little bit longer for them to orient themselves and make their way to the surface.
Start with dormant tubers, purchased from late winter through early summer. Most nurseries offer at least half a dozen varieties; however, thousands of varieties are available. There is almost no limit to your choices in terms of color, size and leaf shape.
Start tubers in pots until well established. Before planting, inspect tubers carefully and use a sharp knife to remove any damage or bruises. It is a good idea to dust the tubers with a fungicide before planting. If you have some unusually large tubers, they can be cut into sections to produce more plants. Make sure you leave a few eyes on each section.
Place the tubers (or sections) with the eyes facing up. Cover them lightly with a high-quality planting medium. Start them off in shallow pots, pans or flats using a 50-50 mixture of sand and peat moss.
If peat moss is not available, coco coir is an excellent choice. In fact, coconut coir is becoming a better choice than peat moss. It performs in a superior manner and is an entirely renewable resource. It makes good use of a by-product of the harvesting and preparation of coconut meat, milk, and water.
When starting tubers all together in a shallow pan, give them each a couple of inches of space. Cover them with your sprouting mixture to a depth of 1 inch.
Once planted, keep the tubers between 70 and 80° to give them a good head start on quick growth. Ideally, you should keep them in a greenhouse; however, if you do not have one keep them in a warm place that receives good sun or use a grow light. You may wish to invest in a grow tent for this purpose.
Transplant tubers into larger pots or outdoors when they have strong roots about 2 inches long. Transfer them from flats or pots using the following mixture:
- One part topsoil
- One part coarse sand
- One half part dried manure
- Two parts peat moss, leaf mold or coco coir
When adding manure to your soil mix, it is usually best to purchase commercially prepared manure. Commercial products are less likely to contain weed seeds than manure you gather yourself. However, if you do have access to fresh barnyard manure (bovine or equine) make sure to compost it thoroughly, so the heat from the compost pile will kill off weed seeds.
Whether you start tubers in the ground or in pots, take care to keep the soil lightly moist until growth starts. Be sure not to over water which can lead to the tubers rotting.
Caladiums in window boxes, pots and planters must have proper drainage. The soil must never become too dry. It is a good idea to use a liner in planter boxes to keep moisture consistent.
Growing Caladium Bulbs In A Flowerbed
In warm climates, consider starting Caladiums directly in the ground. To do this, cover tubers with about three or four inches of good garden soil.
Be sure to prepare the soil thoroughly for planting Caladiums tubers outdoors. You must turn the soil deeply and mix in generous amounts of organic matter such as:
- Rotted manure
- Leaf mold
- Coco coir
Bone meal is also a good addition to this mix. Use half a pound of bone meal and a third of a pound of 5-10-5 fertilizer per square yard. Your Caladium planting mixture should be made up of high-quality organic matter. The soil should be loose and filled with organic matter. You can expect to see your tubers begin to sprout within about a month.
Caring For Caladiums
Caring for Caladiums is very easy. The plants need a warm, rich soil, proper watering and good fertilizing. All in all, Caladiums provide a very synergistic planting experience in that what you reap is far greater than what you sow.
You should always keep the soil evenly moist but not soggy. Once Caladiums begin to grow, you will need to increase the water somewhat to supply the vegetation with ample hydration.
When your plants have become established, care is very easy. Remember to keep plants well watered and apply a balanced liquid fertilizer lightly every two or three weeks.
If you’ve started your potted Caladium indoors, harden them off a bit before transplanting them outside. Begin by setting them out in indirect sun on pleasant days. Leave them out for a few hours at a time.
Be sure to protect them from wind, chill or very strong rays of sun. Increase the time the plants spend outside a little bit at a time every day. At the end of a couple of weeks, they should be ready to be transplanted into an outdoor bed.
Remember, unlike many bulbs and tubers, Caladiums like to be well-watered. Make sure they never dry out, but also make sure they don’t get too soggy. Water right after planting, and mulch over the soil to help preserve the moisture and prevent weed growth. Mulching with leaves and/or partially rotted compost will feed the soil and hold in moisture.
When Determining Spacing, Size Matters!
It’s a good idea to sort your planting by tuber size. There are various grades of Caladiums bulbs, and the grading is based on the bulb diameter.
Generally speaking, if you purchase larger bulbs, you will get better performance. Larger bulbs can provide more energy for the plant.
Naturally, larger bulbs will need to be planted farther apart. A jumbo bulb needs a full square foot or even 18 inches of space surrounding it to grow well. Very small Caladium bulbs may do fine planted only 6 to 8 inches apart.
Caladium tubers come in four sizes based upon tuber diameter. Prices range accordingly.
Here are the four tuber sizes:
- Mammoth tubers are 3 1/2 inches in diameter or larger.
- Jumbo tubers are 2 1/2 to 3 1/2 inches in diameter.
- # 1 tubers are 1 1/2 to 2 1/2 inches in diameter.
- # 2 tubers are 1 inch to 1 1/2 inches in diameter
You can determine how many bulbs you can plant in an area by determining the square footage of your planting area. Do this by multiplying the length by width.
When planting directly into the landscape, spacing varies depending on the size of the bulb. For example, if you have #2 bulbs, you can place four per square foot of soil. If you have #1 bulbs or jumbo bulbs, place one per square foot.
The Eyes Have It!
Remember large bulbs can be cut them into segments as long as each segment has an eye; however, this will result in reduced leaf production.
The eye is where the foliage growth emerges. Use a very sharp knife to remove the central eyes, and you will actually encourage more leaf growth. The larger tubers have a greater number of leaf buds. This means they will create more foliage.
Every Caladium tuber has a greater central bud eye surrounded by a number of smaller buds. If you allow the large central bud to grow, the smaller buds will not grow. This is why you should use a sharp knife to lift out that larger central bud.
Take care not to injure the smaller buds surrounding it. Doing this will stimulate more leaf production, but the leaves will be somewhat smaller.
Caladium Culture
It is easy to provide Caladiums with the culture they want. If you can give them soil rich in humus, steady warmth, and moisture, a sheltered setting and the right amount of balanced fertilizer they will do well. They prefer a slightly acidic soil with a pH that ranges from 6.0 two 6 .5.
A soil temperature of 70° degrees Fahrenheit is best. If you plant early in the spring the cool soil temperature will cause the tubers to rot and die. Always plant after all danger of frost passes and keep an eye on the soil temperature as the season progresses. I
If the temperature rises above 85° degrees Fahrenheit, add a thick layer of mulch. Otherwise, you will end up with mostly green leaves and no brilliant color.
Choosing Fertilizer
When choosing fertilizer for your Caladiums use a balanced liquid or water-soluble fertilizer. This will encourage leaf growth and discourage flower production. Recommendations range from 6-6-6 to a fertilizer of 10-10-10.
To determine what works best for you, consult a local garden club or successful Caladiums grower near you. Caladiums also appreciate bone meal, phosphorus and potash.
With both indoor and outdoor Caladiums you must also keep a close eye on your use of fertilizer. Liquid or water-soluble fertilizer is best and follow packaging directions very closely. Do not overdo fertilizing potted and container plants as this can easily lead to root and tuber damage.
Once or twice a month give your Caladiums a meal of balanced liquid fertilizer and a little bone meal. If they are in full sun, you may want to fertilize more often.
Here Comes Trouble!
When growing Caladiums you will do well as long as you do not allow them to become too wet. With wet feet they can be subject to:
- Sclerotia
- Fungus
- Rot
Clearly, decay is one of the biggest problems for Caladiums tubers. The cause of rot is fungus or bacteria and is always preceded by excessive moisture. You can identify the type of rot by its appearance.
- Fungus causes a dry and chalky sort of rot
- Bacteria causes slimy rot
Regardless of the culprit, water-logging is the initial cause. If you plant your Caladiums in light, well-balanced garden soil mix and provide the right amount of light, air and water rot problems should not be an issue.
Fungal Leaf Spot: If you discover brown spots on your leaves, they might be caused by anthracnose fungus. If you just clip off the affected leaves as soon as you notice them, treatment will probably not be necessary. Be careful not to over water mature plants, and protect the leaves from backsplash.
Leaf Burn: Older leaves may become burned around the margins. This can be caused by:
- Too much sunlight
- Too little water
- Excessive fertilizer
Plants with translucent, thin leaves will tend to scorch more frequently than the thicker and hardier varieties. For these more delicate types, a lack of potassium or phosphorus may show up as scorching. For older foliage, this problem may be caused by lack of water.
Always water close to the ground, either early in the morning or late in the evening to prevent backsplash and excessive evaporation.
Other problems include root knot nematodes. To avoid this problem, always start your tubers in pots rather than setting them directly in the ground. This helps protect them from the root knot nematode. It is also always smart to use sterilized soil when starting and planting your tubers.
What to Do When the Season Is Over
At the beginning of the autumn or the winter when the temperature drops below 60°, you have a choice.
- Dig up all your Caladiums and store them
- Leave them in the ground to fend for themselves
In warmer areas, they may handle the winter just fine. This is especially true if plants receive a nice thick coat of mulch to keep them warm.
If you live in the deep South, many simply mulch over the Caladiums and store them right in the ground through the winter. Naturally, tubers with still require separating from time to time, so they don’t become overcrowded. This creates a very trouble-free way to keep Caladiums.
In cooler climates after the first frost, dig up your tubers. Store them properly in a warm, dry place. Allow the foliage to dry and then remove it. Allow the tubers to dry in the open air for a few days.
Place the tubers in dry sand or vermiculite, or take them out and shake off the excess dirt and store them in a warm dry place in a net bag. The bags that oranges, grapefruits and onions come in are good for this purpose. Store them at a temperature ranging 55° – 65° degrees Fahrenheit for the rest of the winter (as long as five months).
Alternately, you may simply dig up representatives of each of your types and store them knowing that the ones you leave will not be there anymore when spring time comes. A third alternative is simply to treat all of your Caladiums as if they were annuals. Leave them where they are and start over again in the new year.
How to Handle Potted Caladium in Dormancy
As the weather cools, your plants will begin losing their leaves. This means it’s time for them to rest for the winter. You should not dig up the tubers or remove their leaves. Instead, gradually decrease the amount of water you give them. When leaves wither and fall, stop watering altogether.
You can leave tubers in place in their pots, or you place the tubers in net bags or a dry medium as described above. Be sure to store your tubers at temperatures between 55 and 65° degrees Fahrenheit.
Another alternative for potted Caladiums or those brought in for the winter is to keep them alive through the winter in your window garden. If you do this, allow them a rest period for a month and then pot or repot them and set them in the sun so that they can start growing again.
Why Grow Caladiums?
As we look about for new and unusual plants for our gardens, we often overlook old treasures which have been forgotten. Sometimes, false notions about their culture or lack of knowledge keeps us from growing them. Then, too, worthwhile plants often fail to get proper recognition because little is written about them.
Colorful caladiums plants are a delight. They have a wide variety of uses in the landscape, as houseplants and in floral arrangement. Caladiums come in combinations of various shades of green, chartreuse, red, rose, pink and white. The plant is a classic that can brighten any garden, patio, sun porch or home.