The genus Iris (EYE-ris) may only have about 300 species to its name (and some estimate even less), but it’s so diverse that there are 6 different subgenres.
Of these, 4 have bulbs, and 2 have rhizomes, which are confusing even for veteran iris growers.
Even more confusing is the habit of irises to have a wide range of different care needs, such as the yellow flag iris’s need for boggy soil versus the Algerian iris and its need for more arid conditions.
However, the most confusing thing for many iris enthusiasts is how long the bumps can be stored before planting.
Since a need for division is one thing every iris has in common, this question will invariably come up for anyone owning an iris plant.
How Long Can You Keep Bulbs Before Planting Iris?
Iris bulbs tend to be viable for up to a month, although certain conditions can affect their lifespan.

Not only will you need the proper storage conditions, but you’ll have to consider the health of the bulb and what season you’re storing it in.
Shelf Life Of An Iris Bulb
An iris bulb has a shelf life of only 4 to 6 weeks when properly stored.
The bulbs are highly susceptible to drying out and rotting, making them very difficult to store.
For the best results, it’s generally suggested you plant the bulbs as soon as possible, either in a pot or the garden.
Warning: Bulbs Are NOT The Same As Rhizomes!
Before going any further, it’s vital to bring up one of the most common misconceptions in iris care.
Despite what most websites (and even some experts) claim, iris bulbs are not the same thing as an iris rhizome, and mistaking the two will often lead to heartache.
The only irises to have rhizomes are:
- The subgenera Iris (bearded)
- Limniris (non-bearded)
They’re also the most popular.
When planting, an iris rhizome will have up to ⅓ of its height exposed, while a bulb must be produced to a depth of 3 times its height.
The two also spread differently, with bulbs producing buds that become new bulbs while the rhizomes extend in an almost ginger-like way.
Cut a tiny sliver off to tell if your iris has a bulb or a rhizome.
If the interior is white and starchy like a potato, you have a rhizomatous iris and will need to store it differently.
However, if you see layers like an onion, your iris is a bulbous type, and it’s safe to read on.
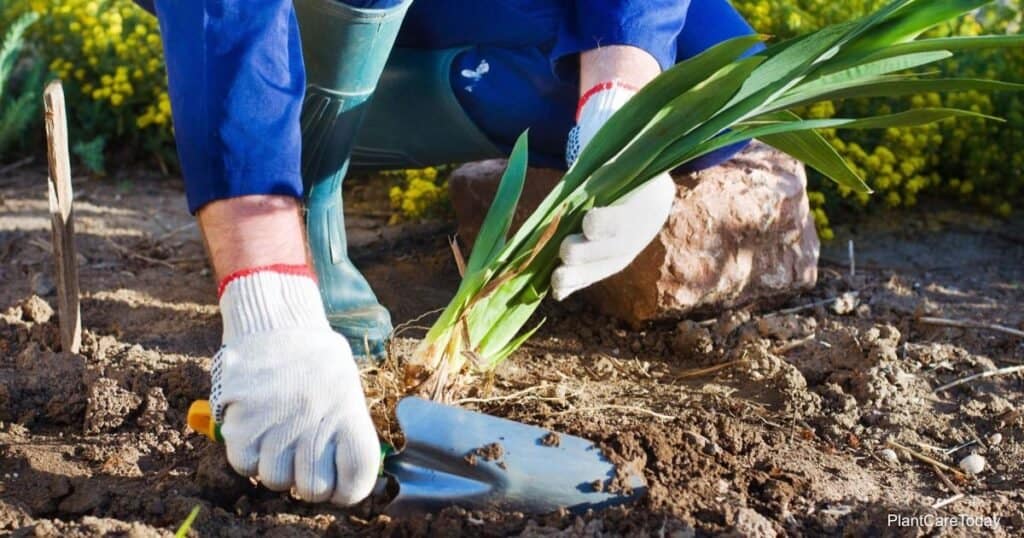
Harvesting Iris Bulbs
The bulbs should be harvested in autumn before the first frost hits.
Begin by doing the following:
- Dig around the iris clump using a spade or garden fork and gently tilting the clump out of the ground.
- Give a small amount of space so you don’t damage any trailing roots, usually 2” to 3” inches.
- Gently remove all excess soil, being careful not to damage the fragile bulbs.
- You may wish to remove the soil with your hands or a low-pressure hose.
- If you haven’t already cut back your irises, you should now trim the leaves back to around 3” to 4” inches.
Divide The Bulbs
Divide your bulbs and check thoroughly for signs of disease or infestation.
Tiny holes in the bulb are evidence of iris borer infestation.
A foul odor or soft spots suggest rot.

Any bulbs damaged during excavation should also be discarded.
While it’s possible to salvage a damaged or partially diseased bulb, the risks far outweigh any potential benefits.
Dry The Bulbs
Next, sit the bulbs in the sun or a bright window to dry.
It will take about 1 to 2 days in full sun or 3 to 4 days indoors for the bulbs to dry out enough for the next step.
If they don’t feel dry when you touch them, let them continue to sit for a while longer.
Curing The Bulbs
This necessary step helps the bulbs adapt from their previous conditions to your storage area.
- Find a dark, dry place such as a basement or garage with temperatures not higher than 70° degrees Fahrenheit.
- Let the bulbs remain there for about 2 weeks.
- Coat in antifungal powder or sulfur powder.
Storing For The Winter
Once the bulbs are properly cured, do the following steps:
- First, place them in a clean, shallow container with plenty of ventilation.
- Shallow plastic boxes without a lid work well for this task.
- Next, create a storage medium using an equal mix of damp peat moss, fine wood shavings, and sand.
- Use this mix to cover your bulbs with a single layer.
- Conversely, you can individually wrap each bulb in a single layer of newspaper.
Check Frequently
The risk of rot or overdrying cannot be stressed enough, and it’s important to check your bulbs every 2 to 3 days while in storage.
When a bulb becomes so dry that it starts to brown, dot these following tips:
- Lightly mist the storage mixture, but be careful not to get the bulb itself wet or dampen any healthy bulbs nearby.
- Any bulbs showing signs of rot or disease should be discarded immediately.
Remember, the bulbs will only last 3 to 4 weeks while in storage, as you’ve already spent 2 weeks curing them, so you should make plans to pot or plant them before this period has ended.