The Hoya, aka Wax Plant, is an attractive, semi-woody vining plant with big, egg-shaped, waxy leaves and white, star-shaped fragrant blooms.
Use Hoya stem cuttings to propagate this pretty plant as it is the most reliable method. Growing from seeds is challenging and unreliable.
Propagating Hoya Plants From Cuttings In Soil
Take your Hoya plant cuttings, in the springtime, when the parent plant is growing actively. Before you do, gather your equipment:

- Vermiculite, perlite, or coarse sand for improved drainage
- A small pot with holes for good drainage
- A sharp cutting tool
- Well draining potting mix
- A chopstick or similar tool
- Water

Then follow these seven steps:
- Mix up about two parts potting mix and one part sand, perlite, or vermiculite.
It is also possible to start Hoya cuttings in a soil-less mixture of:

- Three parts coco-coir
- Three parts perlite
- One part vermiculite soil
Whichever recipe you choose, fill your container with the mixture and water it thoroughly. Set it aside while you get your cuttings.

TIP: Commercial orchid mix also works well to root and grow Hoyas.
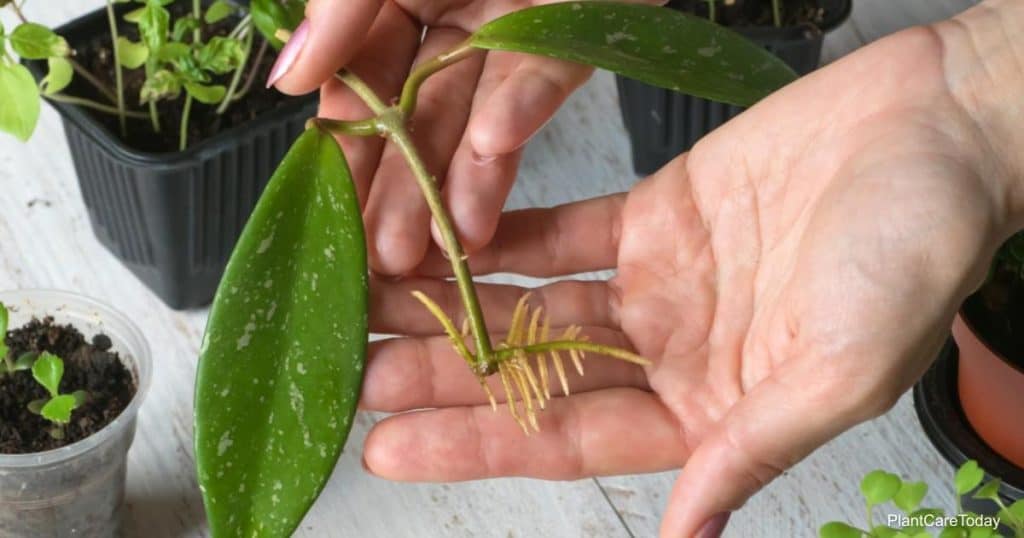
- Choose a healthy stem that is about 4″ or 5″ inches long. It should have two or three leaves near the tip. Remove any leaves from the lower part of the stem. Don’t let any of the leaves touch your potting mix.

- Dip the lower part of the stem in a rooting hormone before planting. Either powdered rooting hormone or the natural gel from an aloe vera leaf will work.
- This step isn’t necessary, but it can increase your chances of success.

- Use a chopstick or other long, thin tool to poke a hole in your prepared soil mixture. Insert the lower half of your cutting’s stem and firm up the soil around it.
- Place the pot in an area that is consistently warm and receives bright, indirect sunlight.
- Check the soil regularly, and be sure to keep it evenly moist at all times until you begin to see new growth. As your cutting sets down roots, the soil should stay slightly damp but never soggy. Too much water will cause root rot.
- When you begin to see new growth, you can move your young plant to a slightly brighter setting. Then reduce watering to allow the soil to become almost dry before watering thoroughly.
Related: Popular Types of Hoya Varieties to Collect and Grow

How To Propagate Hoyas In A Glass Of Water
It is also possible to take cuttings, as described above, and pop them into a glass or vase of fresh water. Set them in a warm area that receives bright, indirect light.
Related: Tips on Lighting for Hoya Plants here.

Change the water every day or two to prevent stagnation and rot.
Watch for roots. When you see new roots growing on the stems, transfer your cuttings to pots of soil or a soil-less mixture as described above.

Keep the potting substrate damp until you see new growth. Then care for the plants as mature plants.
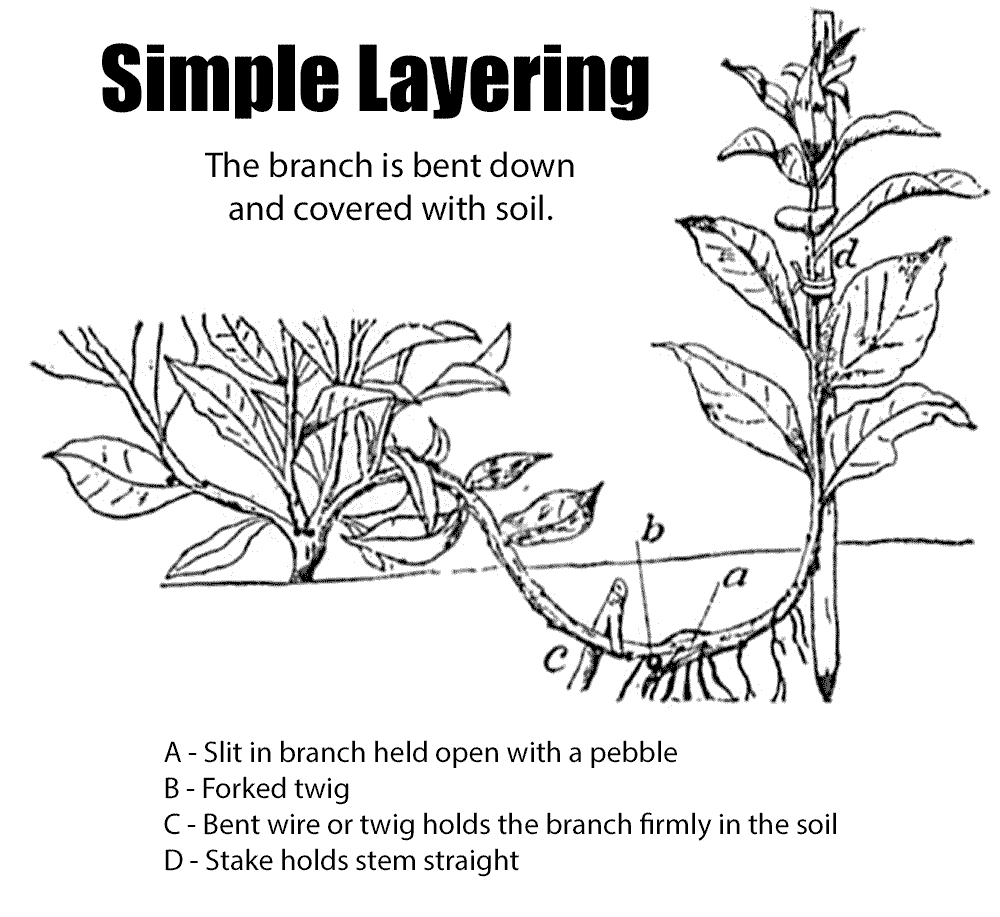
Propagate Hoya Wax Plants By Layering
Layering has long been a simple method of propagation. For many plants such as the Hoya, layering is a fast simple way to increase your plant colllection.

Follow These Layering Steps to Propagate Your Wax Plants
- Place a pot of fresh moist soil near your current growing Hoya
- Bend over a Hoya stem until it makes contact with the soil
- DO NOT detach the stem from the mother plant
- Anchor the stem to the soil.
- Keep the soil moist in the new “starter” pot
- After roots develop, cut the new plant away from the mother plant

- Grow and care for your new plant as you would your mature plants
The image below will give you the basic idea of layering your Hoya
Enjoy Your Hoya!
Whichever method you choose, your Hoya will be happy in its small pot for a couple of years with correct care, watering, and feeding.
Related: Hoya Overwatering – What Are The Signs?
Provide consistent warmth, bright, indirect sunlight, and a monthly, light feeding of water-soluble fertilizer year-round.
When the plant is not blooming, the fertilizer NPK rating should be 2-1-2 or 3-1-2.
Early in the springtime, switch to a fertilizer with an NPK rating of 5-10-3 to encourage blooming.