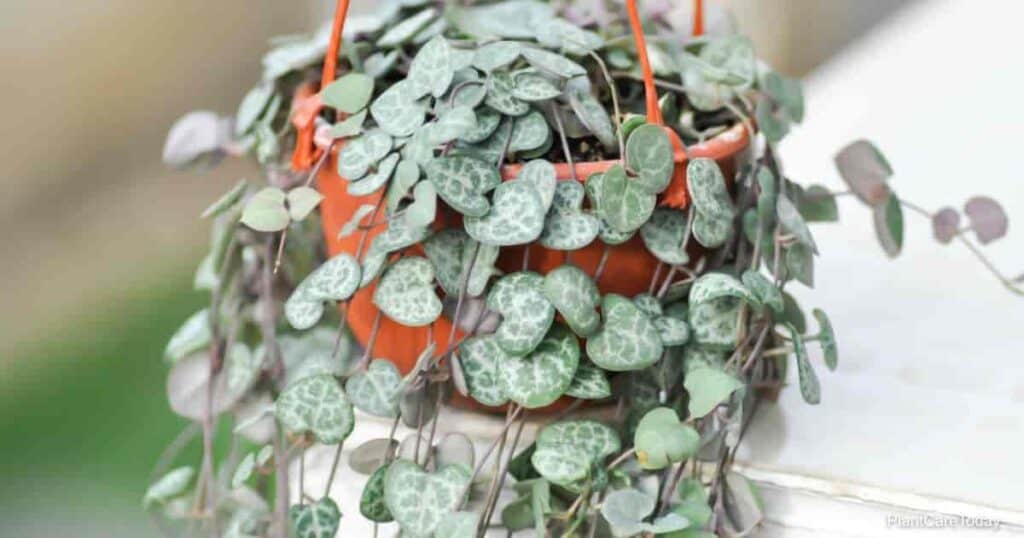
Plants often gain their nicknames based on their appearance, and one of the most appropriate of these is Ceropegia woodii, commonly known as the string of hearts plant.
The plant has long, slender stems with small, heart-shaped leaves alternating down each stem.
Unfortunately, the very things that make this plant beautiful also make it very fragile when overwatering.
If you overwater the plant once, you can simply remove the excess water and give the soil extra time to dry.
However, once the plant begins showing symptoms, it’s already become a serious issue that must be addressed immediately.
How To Save Overwatered Ceropegia?
Obviously, proper watering techniques are the best way to prevent overwatering, but accidents happen (such as a guest or child deciding to “help” without you knowing).
If the plant is showing symptoms, you have a seriously stressed and sick plant on your hands and will need to act fast.
Signs Of Overwatering
Plants have a language, but the dialect can vary.
The “vocabulary” is also limited, so you may have to eliminate some possible causes of a symptom unless you see multiple signs at once.
For the string of hearts plant, the sign you want to look for are:
- Fungal growth or mold on the soil
- Pale or yellowing leaves
- Presence of fungus gnats
- Swollen leaves or edema
- Wilting and leaf drop
Treating A Severely Overwatered String Of Hearts
The good news is your string of hearts will usually be able to recover if treated early enough.
The more you can salvage the plant, the better the chances.
For example, losing ¼ of the foliage and roots will rarely result in a lost plant.
At ⅔ loss, the plant will need extra TLC to bounce back without problems.
But once more than ¾ of the plant is lost, the chances of recovery are drastically reduced, and you may need to salvage some cuttings and propagate new plants, discarding the mother plant.
The good news is that treating the plant isn’t very difficult
Here’s a quick step-by-step that covers all of the essentials:
Pruning And Uprooting
Damaged or diseased foliage still draws nutrients that would be better used elsewhere, so it’s important to prune away any such foliage before you begin.
Any leaves with advanced edema or are beginning to brown will likely never recover, so these should be removed.
However, leaves that have somewhat yellowed will often return to their natural color once the plant can reaccess soil nutrients.
Remember always to use sharp, sterile tools and resterilize between cuts.
A knife generally works best for a small plant such as this one.
Once you’ve finished pruning, do the following:
- Gently slide the plant from its pot.
- Rinse as much of the soil away from the roots.
- Examine the root system. If you see dark brown or black roots, the roots are mushy or smell a foul odor, the plant has contracted root rot.
- You’ll want to discard the pot or soak it for 20 minutes in a solution of 1 part bleach to 9 parts water and air dry it thoroughly to sterilize it.
If there are no signs of root rot, you (and your plant) are fortunate, and you can clean the pot and move to the replanting phase.
Treating Root Rot
We as home growers often hear about fungal root rot, but several bacterial strains can also cause root rot.
As both fungal and bacterial root rot have nearly identical symptoms, it’s best to treat all rot cases as bacterial instead of relying on fungicides.
That said, you will want to use your knife to cut away every root that shows signs of rot, one at a time.
Once the rot has been removed, you’ll need to sterilize the roots to kill any remaining infection.
One of the best options is a solution of 1 part bleach to 10 parts water for 30 minutes.
This isn’t as strong as the solution for treating pots, so it’s safer for the plant.
Replanting And Aftercare
Whether you had to treat root rot, let the plant air dry for 2 to 3 days.
Put some fresh potting medium into your pot (even if you didn’t have root rot, the old soil is likely contaminated by a fungus) and lightly moisten the soil.
Moistening the soil as opposed to watering will give you more control over the soil when replanting and reduce transplant shock.
Now replant your string of hearts and dampen the soil a little more to help it settle.
After replanting, use proper watering techniques and avoid giving it any fertilizer for 1 to 2 months while the root system regenerates.
As the soil or potting medium is fresh, the plant will get plenty of nutrients during this time without the risk of chemical burns from adding fertilizers.
Preventing Overwatering In Future
We’ve mentioned proper watering techniques a couple of times, and one of the best methods is known as soak-and-dry.
This method involves testing the soil (usually through the finger trick) and using basic visual cues to know when the soil is saturated.
While it won’t work on every plant, this method can be used on most indoor and outdoor plants and is surprisingly reliable.
The Finger Trick
This little trick lets you know when to water a plant using just your index finger, as the name implies.
On an average-sized adult hand, the length of the index finger from the tip to base (NOT the third knuckle) is about 3” inches long, the first and second knuckles serving as 1” inch markers.
If you have a smaller hand, you can simply put your finger beside a ruler to note each inch.
After using the trick a couple of times, these distances will be second nature.
Stick your finger straight down into the soil to check for moisture.
If the soil feels dry 1” inch down, the plant needs to be watered.
You can also visually check for moisture when removing your finger, as damp soil will stick.
If you have nerve damage or other problems feeling for water, you can substitute a popsicle stick or wooden chopstick.
Mark the 1” inch point and stick it straight down into the soil up to that mark.
Leave it for 20 minutes, and when you remove it, the stick will be darker if moisture is present.
The Soak-And-Dry Method
The entire trick to this method is that y9ou need to pour water SLOWLY.
If you start pouring and the soil doesn’t immediately soak up every drop, you’re pouring too hard.
Again, this becomes muscle memory after only a few times.
Pour slowly and evenly, working your way around the pot and ensuring you don’t get the plant itself wet (this can lead to fungal infections or sunburn).
Two different signs show that the soil is properly saturated and it is time to stop.
The first sign is if the soil can no longer absorb at the same rate you’re pouring.
The second is if you see moisture beginning to seep from the drainage holes.